Garage Floor Moisture Test Before Epoxy — 3 Methods
Moisture is the invisible killer of garage floor coatings. It takes about 10 minutes to set up a moisture test, costs between nothing and $60, and can save you hundreds of dollars in wasted product and labor. Here are three proven methods, from free to professional-grade, so you can pick the one that fits your situation.
Why Moisture Testing Matters
Moisture is the single most common cause of epoxy floor failure. When water vapor pushes up through a concrete slab — a process called moisture vapor transmission or hydrostatic pressure — it creates a barrier between the coating and the concrete surface. The epoxy cures on top of this invisible moisture layer, and the bond never properly forms. Within weeks or months, the coating bubbles, peels, or delaminates in sheets.
The tricky part is that a floor can look and feel completely dry to the touch while still transmitting significant moisture vapor. Concrete is porous, and moisture from the ground below can wick upward continuously. This is especially common in garages built on slabs without a proper vapor barrier membrane beneath them, older homes, homes in areas with high water tables, and during spring when groundwater levels rise.
You cannot skip this step. Even if your garage floor has never shown visible water, even if you live in a dry climate, a 10-minute moisture test is the cheapest insurance you can buy for your epoxy project. If you're curious about other ways coating projects go wrong, our guide to common epoxy floor problems covers the full list.
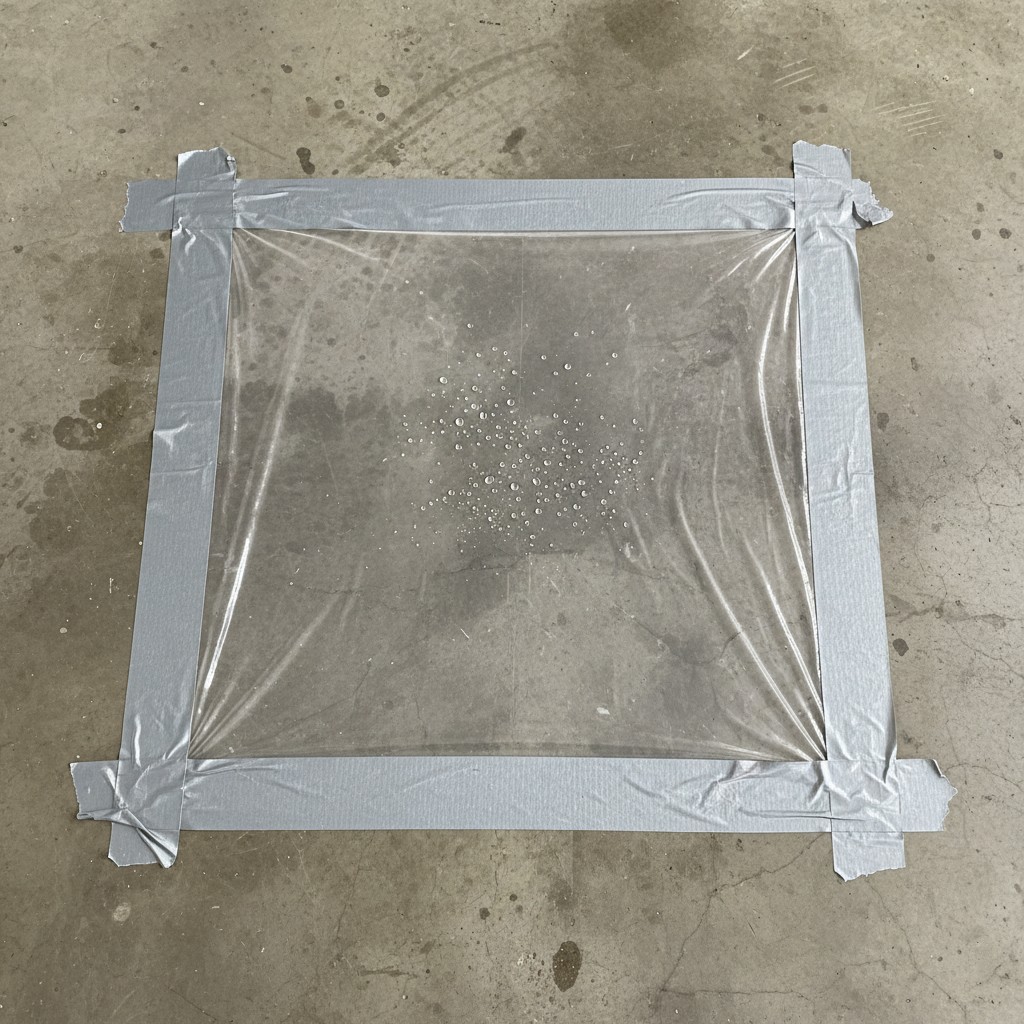
Method 1: Plastic Sheet Test (Free)
This is the simplest and most widely used DIY moisture test. It costs nothing if you have plastic wrap or a garbage bag, and it gives you a clear yes-or-no answer about moisture presence.
What you need: A piece of clear plastic sheeting approximately 2 feet by 2 feet (a clear garbage bag cut open works fine), and duct tape or heavy-duty packing tape.
Steps:
- Clean a 2x2 foot area of your garage floor. Remove any dust, dirt, or debris. The area should be representative of the floor — don't pick the driest-looking spot.
- Lay the plastic flat on the floor. Tape all four edges securely with duct tape, creating an airtight seal. Press the tape down firmly so no air can enter or escape from the edges.
- Wait 24 hours. Don't park on it. Don't disturb it.
- After 24 hours, check for two things: (a) condensation or water droplets on the underside of the plastic, and (b) darkening of the concrete beneath the plastic compared to the surrounding floor.
Interpreting results: If you see any condensation on the plastic or the concrete is noticeably darker underneath, you have a moisture problem. If the plastic is dry and the concrete color is unchanged, you're likely in the clear.
Pros: Free, requires no special equipment, easy to do.
Cons: Qualitative (yes/no) rather than quantitative (how much). Doesn't tell you the actual moisture vapor emission rate. Can be affected by ambient humidity. Best used as an initial screening test.
Pro tip: Do this test in at least three spots — the center of the garage, near an exterior wall, and near the garage door. Moisture levels can vary significantly across a single slab. If any spot fails, treat the entire floor as having a moisture issue.
Method 2: Calcium Chloride Test ($15-25)
This is the industry-standard quantitative test defined by ASTM F1869. It measures the actual moisture vapor emission rate (MVER) from your concrete in pounds per 1,000 square feet per 24 hours. Most coating manufacturers reference this test when specifying maximum acceptable moisture levels for their products.
What you need: A calcium chloride test kit (check price), available at home improvement stores or online for $15-25. Each kit contains a pre-weighed container of calcium chloride, a plastic dome cover, and instructions.
Steps:
- Ensure the floor has been exposed to normal conditions for at least 48 hours — no recent mopping, power washing, or heavy rain that could artificially elevate moisture readings.
- Record the starting weight of the calcium chloride container (pre-weighed by the manufacturer, printed on the kit).
- Place the open container on the floor. Cover it with the sealed dome, taping the dome edges to the floor to create a sealed environment.
- Wait 60-72 hours. Do not disturb the test.
- After the waiting period, remove the dome and immediately seal the calcium chloride container. Weigh it on a kitchen scale.
- Calculate the weight gain. The kit includes a formula to convert grams gained to lbs/1000 sq ft/24 hours.
Interpreting results:
- Under 3 lbs/1000 sq ft/24 hrs: Safe for most epoxy coatings. Proceed with your project.
- 3-5 lbs/1000 sq ft/24 hrs: Borderline. Use a moisture-tolerant primer or vapor barrier primer before coating.
- Over 5 lbs/1000 sq ft/24 hrs: Too much moisture for standard epoxy. Address the moisture source before coating, or use a dedicated vapor barrier system.
Pros: Quantitative result that matches manufacturer specifications, recognized industry standard, relatively inexpensive.
Cons: Takes 60-72 hours, requires a kitchen scale accurate to at least 1 gram, only measures one spot per kit (buy 2-3 for a full garage).
Method 3: Digital Moisture Meter ($25-60)
If you want instant results and plan to reuse the tool (useful for checking moisture in wood, drywall, and other materials around the house), a digital moisture meter is a worthwhile investment.
Types of meters:
- Pin-type meters ($25-40): Two metal pins press into the material surface. Measures electrical resistance, which correlates to moisture content. Works on concrete but pins may not penetrate smoothly.
- Pinless (capacitance) meters ($40-60): A flat sensor pad presses against the surface (check price). Measures moisture through the material without making contact. Generally better for concrete because there's nothing to press into the hard surface. Reads deeper into the slab (typically 3/4 inch).
How to use: Turn on the meter and set it to the concrete/masonry setting if available. Press firmly against the floor surface. Take readings in a grid pattern across the entire garage — every 3-4 feet in both directions, plus along all walls, near any visible cracks, near drains, and in any areas that appear darker or feel cooler than surrounding concrete.
Interpreting results:
- Below 4% moisture content: Acceptable for most epoxy coatings.
- 4-5%: Borderline. Consider a moisture-mitigating primer.
- Above 5%: Too wet for standard epoxy application. Address the moisture source.
Pros: Instant results (seconds per reading), reusable for other projects, can test many spots quickly to map moisture patterns across your floor.
Cons: Less precise than the calcium chloride test for absolute values, readings can be influenced by surface contamination or recent cleaning, most meters need periodic calibration.
Best practice: Use a moisture meter for quick screening across the entire floor, then confirm any suspect areas with a calcium chloride test. This combination gives you both speed and accuracy.
What If My Floor Fails the Moisture Test?
A failed moisture test doesn't necessarily mean you can't coat your floor. It means you need to address the moisture before applying a standard epoxy. Here are your options, from simplest to most involved:
Vapor barrier primer: Products like Rust-Oleum VaporStop (check price) and similar moisture-mitigating primers are designed to seal the concrete surface against moisture vapor transmission up to a certain level (typically up to 25 lbs MVER). They cost $40-80 per gallon and cover about 200 sq ft. Apply the primer first, let it cure, then apply your epoxy over it. This is the most common solution and works for the majority of residential garage moisture issues.
Exterior drainage improvements: If moisture is entering the slab from the sides (surface water pooling against the foundation), improving exterior grading and adding or cleaning gutters can reduce the moisture load. This is a longer-term fix but addresses the root cause.
Dehumidifier: Running a dehumidifier in the garage for several days before and during application can lower ambient humidity enough to tip borderline readings into the acceptable range. This doesn't solve subslab moisture but helps with surface condensation and high ambient humidity.
Wait for a dry season: Moisture vapor emission rates fluctuate seasonally. Spring and early summer tend to be worst (high water tables, snowmelt). Late summer and fall are typically the driest. If your reading is borderline, testing again in a drier month may yield a passing result.
What you should NOT do: Do not ignore a failed moisture test and apply epoxy anyway. The coating will fail — usually within weeks to months — and you'll have to strip the entire floor and start over. The vapor barrier primer adds $80-160 to your project cost; a failed floor adds $500+ in wasted materials and a full weekend of re-work.
When to Test
Timing your moisture test correctly is almost as important as doing the test itself. Here's when to test — and when to wait:
- Before any coating project: Always test before your first epoxy, polyurea, or paint application. No exceptions.
- After heavy rain: Wait at least 3 days after significant rainfall before testing. Elevated moisture immediately after rain doesn't represent your floor's normal condition. You want to measure the baseline level.
- After power washing: Wait at least 48 hours, ideally 72, after washing the garage floor before testing. The concrete needs time to release the water it absorbed during cleaning.
- In spring: If you're in a region with winter frost, test in mid-to-late spring when water tables are at their highest. This gives you a worst-case reading. If you pass in spring, you'll pass year-round.
- New construction: Freshly poured concrete needs 28-60 days to cure and dry sufficiently for coating. Test at the 28-day mark and again before coating. Some slabs take 90+ days to reach acceptable moisture levels.
Related Reading
Once your floor passes the moisture test, the next step is surface preparation. Our complete guide to prepping a garage floor for epoxy walks through degreasing, profiling, and everything else you need before the first coat goes down. Ready to calculate your materials? Use our free epoxy floor calculator to get exact quantities for your garage dimensions and chosen coating system.