How to Prep a Garage Floor for Epoxy Coating
Surface preparation is the single most important factor in whether your epoxy floor succeeds or fails. Professional installers will tell you that prep is 80% of the job and the coating is 20%. Get the prep right and even a budget epoxy kit will perform well. Rush it or skip steps and the most expensive coating on the market will peel, bubble, or delaminate within months.
This guide walks through every step of prepping a concrete garage floor for epoxy, polyurea, or any resinous floor coating. Once your floor is ready, use the epoxy floor calculator to figure out exactly how much material you need.
Why Floor Prep Is 80% of the Job
Nearly every epoxy failure you have seen or read about — peeling sheets of coating, bubbling, milky discoloration, flaking around oil stains — traces back to inadequate preparation. Epoxy does not simply dry like paint. It chemically bonds to the concrete surface through both chemical adhesion and mechanical grip. If the surface is not clean, porous, and profiled, that bond cannot form properly.
Here is what goes wrong without proper prep:
- Delamination — The entire coating lifts off in sheets because it never bonded to the concrete. This is almost always caused by moisture, contamination (oil/grease), or a surface that was too smooth.
- Peeling at edges — Common near garage doors and expansion joints where moisture enters from below or the sides.
- Bubbling — Trapped moisture or air escaping through the concrete as the coating cures. Also called outgassing.
- Fish eyes — Small circular craters in the coating caused by silicone contamination (often from tire dressing or spray products used in the garage).
The good news is that thorough prep is not complicated. It just requires patience and following each step completely before moving to the next. For a comprehensive look at what can go wrong, see our epoxy garage floor problems guide.
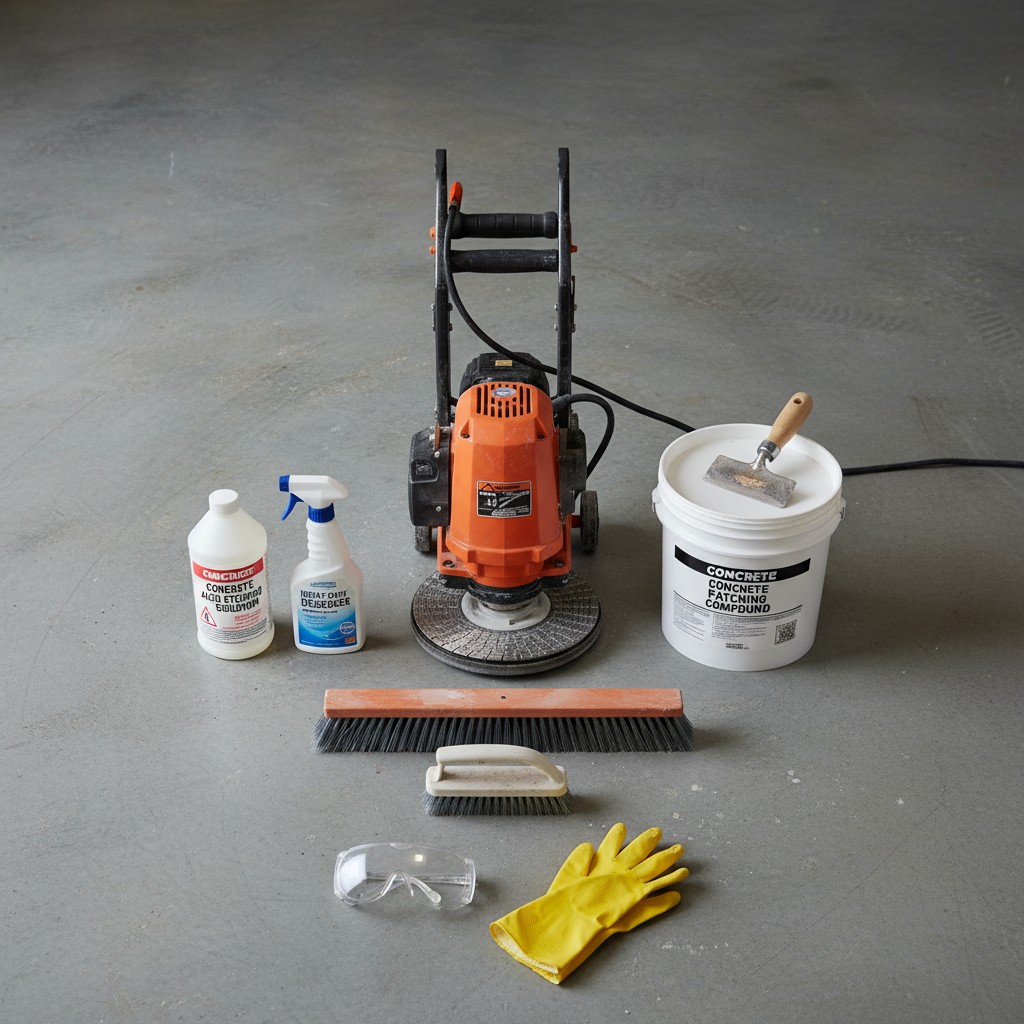
Tools & Materials Checklist
Gather everything before you start. There is nothing worse than pausing mid-etch because you forgot to buy a neutralizer.
Cleaning & Degreasing:
- Concrete degreaser — Zep Purple Industrial (check price), Simple Green Concrete & Driveway, or Krud Kutter
- Stiff-bristle scrub brush (not wire — wire can leave metal particles)
- Push broom
- Garden hose with spray nozzle or pressure washer (1,500-2,500 PSI for pressure washing)
- 5-gallon buckets (at least 2)
Testing & Repair:
- Clear plastic sheeting (at least 2x2 feet) for moisture testing
- Painter's tape
- Concrete patching compound — Quikrete Vinyl Concrete Patcher (check price) or similar
- Putty knife or margin trowel
Surface Profiling:
- Acid etch solution — Rust-Oleum Clean & Etch (check price), muriatic acid, or phosphoric acid based, OR
- Diamond grinder rental ($50-100/day) with dust shroud and vacuum attachment
- Watering can or plastic sprinkler (for even acid distribution)
- Baking soda or TSP (for acid neutralization)
Safety Gear (non-negotiable):
- Chemical-resistant rubber gloves
- Safety goggles (not glasses — goggles that seal around your eyes)
- Respirator with acid gas cartridges (for acid etching) or P100 dust cartridges (for grinding)
- Rubber boots
- Long pants and long sleeves
Final Prep:
- Shop vacuum (wet/dry capable)
- Painter's tape for masking walls and trim
- Plastic sheeting for protecting walls from splatter
Step 1 — Clear and Clean the Floor
Start by removing absolutely everything from the garage floor. Shelving, storage bins, tools, vehicles — all of it. You need access to every square inch of concrete, including along the walls and in corners where grime accumulates.
Sweep the entire floor thoroughly with a push broom to remove loose dirt, dust, leaves, and debris. Then rinse with a garden hose using a strong spray setting. If you have access to a pressure washer, this is a good time to use it at a moderate setting (1,500-2,000 PSI) to blast out embedded dirt from the concrete pores.
Pay special attention to the area just inside the garage door where road grime, salt, and tire debris accumulate, and the corners where dust bunnies and spiderwebs collect. Allow the floor to dry completely before proceeding — at least 4-6 hours in warm, dry conditions.
Step 2 — Degrease Oil Stains
Oil and grease are the number-one enemies of epoxy adhesion. Even a small oil spot that looks like it has dried will prevent the coating from bonding in that area, resulting in a visible circle of peeling within weeks.
Apply your concrete degreaser full-strength to every visible stain. Scrub vigorously with the stiff-bristle brush, working the degreaser into the concrete pores. Let the product sit for 15-30 minutes (check the product label for specific dwell times), then scrub again and rinse thoroughly with clean water.
For deep, long-standing oil stains — the kind that have darkened the concrete over years — apply a thick layer of degreaser and cover with plastic sheeting overnight. The extended dwell time allows the degreaser to penetrate deep into the concrete and emulsify the oil. You may need to repeat this process 2-3 times for severe stains. If stains persist after multiple treatments, mechanical grinding that area is the most reliable solution.
After degreasing, do a water test: pour a small amount of water on each previously stained area. If the water beads up instead of absorbing, oil contamination remains and you need another round of degreasing.
Step 3 — Test for Moisture
Moisture vapor transmission (MVT) through concrete is a silent killer of epoxy floors. Water vapor continuously migrates upward through concrete slabs, and if the rate is too high, it will push the coating off from below. This is especially common in older homes without a vapor barrier beneath the slab, or in areas with high water tables.
The simplest test is the plastic sheet method: tape a 2x2 foot piece of clear plastic sheeting flat against the concrete using painter's tape on all four edges. Make sure the tape creates a good seal. Wait 24 hours. When you peel it up, look for:
- Condensation droplets on the underside of the plastic
- Darkened concrete beneath the plastic compared to the surrounding area
- Dampness to the touch on the concrete surface
If any of these are present, you have a moisture issue. Do not proceed with the coating. Options include: installing a moisture-mitigating primer (adds $100-300 to your project), waiting for drier conditions, or addressing the water source (grading, drainage, or gutters). For a more detailed look at moisture testing methods, see our garage floor moisture test guide.
Perform this test in at least 3 locations: center of the floor, near the garage door, and near an exterior wall.
Step 4 — Repair Cracks and Divots
Cracks, spalls (surface flaking), and divots need to be filled before profiling the floor. Epoxy will bridge small hairline cracks, but anything wider than a credit card should be repaired. Deep cracks, expansion joint damage, and areas where the surface has flaked away (spalling) need proper patching to create a smooth, level surface.
Use a quality concrete patching compound — products like Quikrete Vinyl Concrete Patcher or DAP Concrete Patch work well for most residential repairs. For cracks, use a crack chaser or angle grinder with a diamond blade to widen the crack into a V-shape first. This gives the patching material more surface area to grip.
Apply the patching compound with a putty knife or margin trowel, slightly overfilling each repair. The compound will shrink as it cures, so overfilling ensures a flush final surface. Smooth the edges to blend with the surrounding concrete. Allow repairs to cure for a full 24 hours before profiling — rushing this step leads to patches pulling out during etching or grinding.
For expansion joints, do not fill them. Expansion joints exist for a reason (to allow the slab to move). Coat over them, but expect that the coating over joints may crack over time as the slab moves seasonally.
Step 5 — Profile the Surface
Surface profiling creates the microscopic texture that epoxy needs to mechanically grip the concrete. A smooth, sealed, or polished concrete surface will reject epoxy no matter how clean it is. You need to open the pores of the concrete so the coating can flow into them and lock in place.
There are two primary methods:
Acid Etching: The most common DIY approach. You dilute muriatic acid (hydrochloric acid) or use a pre-mixed phosphoric acid etch solution, apply it to the damp floor, let it fizz for 10-15 minutes, then neutralize and rinse. The acid dissolves the top layer of cement paste, exposing the aggregate below and creating a rough texture.
Mechanical Grinding: Uses a diamond floor grinder to physically abrade the surface. More consistent results than acid etching, works on previously sealed or painted floors, and does not produce hazardous acid fumes. The main downside is cost — grinder rental is $50-100/day, plus diamond pads.
For a detailed comparison of these methods with step-by-step instructions for each, read our acid etching vs grinding guide.
Regardless of method, the target profile is CSP 2-3 (Concrete Surface Profile). In practical terms, the surface should feel similar to 120-grit sandpaper — rough enough to catch your fingernail when you drag it across the surface, but not so aggressive that there are visible gouges.
Step 6 — Final Vacuum and Inspection
After profiling and allowing the floor to dry completely, do a thorough final cleaning with a shop vacuum. Go over the entire floor at least twice. Pay special attention to corners, along walls, around support columns, and over any repaired areas. Loose dust and debris left behind will be trapped under the coating and can cause adhesion failures or visible bumps.
Run your hand across the surface — it should feel uniformly rough, like 120-grit sandpaper. Any smooth or glossy patches indicate areas where the profiling was insufficient and need additional grinding or re-etching.
Water bead test: Sprinkle a small amount of water on several areas of the floor. The water should absorb into the concrete within a few seconds, darkening the surface. If water beads up and sits on the surface, that area is either contaminated (oil, sealer) or was not profiled adequately. Address any problem areas before mixing your coating.
At this point, mask off the walls with painter's tape at the base (about 2 inches up) and lay plastic sheeting along the bottom 12-18 inches of the walls to protect from roller splatter. Your floor is now ready for coating.
Common Prep Mistakes
Even experienced DIYers make these errors. Being aware of them ahead of time can save you from a costly redo.
- Skipping the moisture test. This takes less than 5 minutes to set up and 24 hours to read. Skipping it is the most common cause of catastrophic coating failure. Moisture vapor will push even the best coating off the floor within weeks.
- Insufficient surface profiling. The most common version of this mistake is using only the acid etch packet that comes with a big-box store epoxy kit. Those packets rarely contain enough acid to etch more than a few square feet properly. Buy extra etch solution and verify the profile by touch.
- Not enough dry time between steps. Degreasing, etching, patching — each step requires the floor to dry thoroughly before the next one. Impatience here means you are trapping moisture between layers, setting up future failure. In cool or humid weather, extend dry times by 50%.
- Coating over a previously sealed floor. Many newer garage floors come with a curing compound or sealer from the builder. You cannot etch through this — acid etching simply will not work on sealed concrete. If the water bead test shows water sitting on the surface of an uncoated floor, it is sealed and you must mechanically grind it.
- Ignoring the weather forecast. Applying epoxy when rain is expected, when humidity is above 80%, or when temperatures will drop below 50°F overnight is asking for problems. The coating cures through a chemical reaction that is temperature and humidity dependent.
- Leaving dust behind. A quick pass with a broom is not enough. Use a shop vacuum and go over the floor multiple times. Any dust left on the surface becomes a bond breaker between the concrete and the coating.
Related Reading
- Epoxy Floor Calculator — Calculate how much epoxy you need for your garage
- Acid Etching vs Grinding — Detailed comparison of surface profiling methods
- Epoxy Garage Floor Problems — Troubleshooting guide for common coating failures
- Garage Floor Moisture Test — Complete guide to testing for moisture vapor transmission